Cloudflare Logo

Use CloudFlare for Dynamic DNS on Windows

The most popular Dynamic DNS provider, DynDNS, is now a paid service. There are other alternatives, each with their own pros and cons. Many DNS updaters, modems and routers support DynDNS. If you own a domain already this solution might interest you.

With a Static IP, you only need to create a permanent A record in DNS management. Most domain registrars do not allow Dynamic DNS. The server I want to access via subdomain has a Dynamic IP. While researching possible solutions, a friend hinted that you can update A records using the CloudFlare API. The domain already uses CloudFlare, so this is great news.

If you have got this far, you already know how to configure your firewall and port forward. You should be able to access the server from the internet using your IP address and port.

Follow the CloudFlare setup to point your nameserver to the correct location. If you intend to use a subdomain, create the A record in DNS management. Make sure CloudFlare is off for this record (optional, might be ok for your purposes).
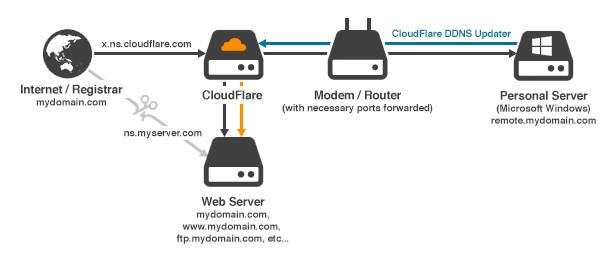
Cloudflare Diagram

There are various ways to make a CloudFlare DNS updater, but no easy solution for Windows. I recently stumbled on one that works well, CloudFlare DDNS Updater. You can download it here.

You will need your API Key, primary domain name and the email address associated with your CloudFlare account. Once successful it will download your DNS records. You can then select which one you want to update. DNS propagation may take some time. Check CloudFlare to see if the address matches your IP address, then test from another internet connection.

It’s usually only $5-10 a year to register a domain. CloudFlare is a free service. This solution is cost effective and cleaner than having a subdomain of a free Dynamic DNS provider. No need to worry about confirming the DNS every 30 days, and remote.mydomain.com is far nicer than mydomain.freedns-rulez.net.

Note: In some environments (64-bit) CloudFlare DDNS Updater will not install as a service, there is a bug in v0.1. If you set the username as .\username rather than just username, it will successfully install as a service.

WordPress Logo

Stay logged in with WordPress on Subdomains

A clients site performs some magic to show different content per subdomain. By default each subdomain asks you to login, which is a bit annoying. It would be convenient if admins of a single WordPress installation could stay logged in when they jump between subdomains.

I found that all we needed to do was set the cookie domain and path in wp-config.php. At first it seemed only COOKIE_DOMAIN and COOKIEPATH would be needed, but it did not behave until COOKIEHASH was also set. You could probably set it to anything you like, I just had a defined variable already.

/**
 * Set cookie properties to allow persistent login across subdomains.
 */
define('MY_DOMAIN', 'thatstevensguy.com');
define('COOKIE_DOMAIN', MY_DOMAIN);
define('COOKIEPATH', '/');
define('COOKIEHASH', md5(MY_DOMAIN) );

This may also work between WordPress installations across subdomains. I haven’t tested this theory. Both installations would require the same login details and this config. It is working with WordPress versions 3.8+.

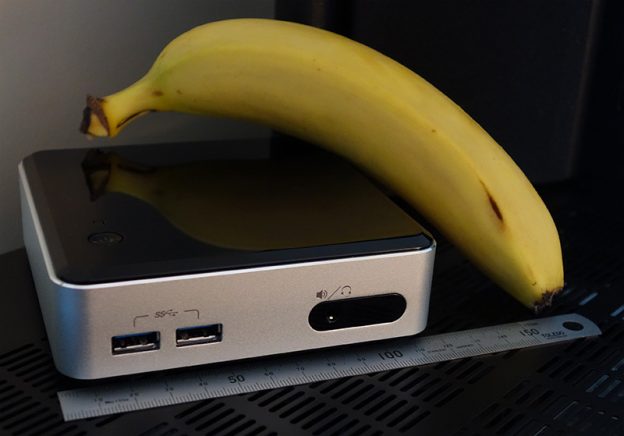
NUC Banana

Adventures with XBMC (Kodi): Intel NUC

In my previous post, I briefly explained the process that I went through to use XBMC (now Kodi) on an old computer.

My old computer didn’t actually die, but I struggled with it for well over a year. It would fail, I’d jiggle the components and it would live on. The Logitech Z5500 control pod is what failed after 7 years of enjoyment. Ideally you want an A/V Receiver that supports HDMI pass-through. I replaced the old home theatre with an affordable Yamaha package, sporting an RX-V375 Receiver, NS-PB120 Speakers, and a YST-SW216 10″ Subwoofer.

The NUC that I chose is the D54250WYK. The most powerful model at the time with an i5 processor. Opening the box you are welcomed with the famous Intel tune, which is a cute gimmick. I’ve dropped in 8GB of Kingston RAM, Intel Wireless AC card and an Intel 30GB mSATA SSD. The last items required are a Cloverleaf (C5) power cable and a Mini-HDMI to HDMI 1.4a cable. These Intel NUC’s are smaller than you think, its an incredible device. It even has an on-board IR sensor.

Make it Work

Of course, the Operating System I’ll be using is OpenELEC. You can download the latest release here. I’ll run you through my forum findings as best I can.

With the BIOS version available at the time of this post. The device would restart instantly when it tried to suspend. I managed to get it working by disabling all settings in the Power options. I then set ‘Wake on LAN from S4/S5’ to ‘Power On – Normal Boot’, and enabled the ‘Deep S4/S5’ setting. With this configuration I am able to send the device into a low power state. I am then able to wake it using the IR sensor and my Harmony 700 Remote. Intel actually responded right after I posted in the long running thread about the issue. There is a beta BIOS that appears to address the bug. I will update when it goes stable.

Once you have installed OpenELEC, you might notice that your remote does not work. The IR driver is not enabled by default. You’ll want to edit the autostart.sh file from another computer on your network using SSH. What is SSH?

After figuring out SSH, enter the following command to edit the file.

nano /storage/.config/autostart.sh

Then add the following lines to the file to enable the driver.

#!/bin/sh

modprobe -r nuvoton-cir
echo "auto" > "/sys/bus/acpi/devices/NTN0530:00/physical_node/resources"
modprobe nuvoton-cir

If you find that your colours are washed out and you have an RGB ‘Full Range’ display like mine, add this line while you are there.

xrandr --output HDMI1 --set "Broadcast RGB" "Full"

Ctrl+X to Save and Exit. Then run this final command for good measure.

chmod 755 /storage/.config/autostart.sh

Now reboot your NUC and check to see if the changes have worked. I am assuming you already have a Windows Media Center SE profile installed on your Harmony Remote, or equivalent device. The remote should now control Kodi, and colours should be deeper.

That’s about all you need to do right now to get the Intel NUC running with Kodi. The rest comes down to personal preference. I might write some posts about more customisations I like to make in the near future.