Category Archives: Lifestyle

Telstra Gateway Max is a Piece of Junk

The Gateway Max is a Piece of Junk

Telstra NBN customers are provided with a Telstra Gateway Max to connect their NBN service. These devices come in 3 tiers and the base unit is a re-branded Sagem f@st 5355 with firmware restrictions. I’m not going to moan about how bad it is. I’d rather just fix it properly.

It is possible to use another NBN ready router. But there is a compromise if you want to maintain Telstra VOIP. Customers are provided with VOIP to replace the disconnected landline. But Telstra do not provide SIP details to residential accounts.

Configuration

You should connect the Telstra Gateway Max to the internet first. This will authenticate the connection. Then you can connect your desired router. No login details are required to authenticate the connection. I’ve personally configured this setup on a FTTN (VDSL) connection using a Fritz!Box 7490.

Telstra NBN - Router - Telstra Gateway - Phone

Plug a network cable into the WAN port of the Telstra Gateway. When you can see that the Telstra Gateway has internet, you’ll need to port forward in your preferred router ports 3478, 5004, 5060 and 5061 for both TCP & UDP. I find it easier to jump between the routers using a separate network cable. When the phone line has a dial tone, go back into the Telstra router and turn off WiFi, DHCP and the Media Server to save power.

Note: If you run into connection issues, Telstra will require that you have their Gateway connected directly to the internet for tech support to help you.

Windows 10 Logo

How to Reset Your Windows 10 Password

I have pieced together several guides to come up with a reliable method of resetting a Windows 7, 8 or 10 password. I’m not sure if it will work for user accounts tied to a Windows Live account on Windows 10 though. The below video by Nehal J Wani on YouTube forms the core of this solution. You should only need to use this method if you do not have a copy of Windows, or a Password Recovery Disk.

Download UNetbootin. This application creates bootable Linux Distributions. It is cross platform but my guide will focus on creating the Live USB using Mac. Bring up the context menu in Finder and select Open. Enter your password to let Mac open the application.

Unfortunately the Distribution is not listed as a download in this application. So you’ll want to download SystemRescueCd ISO as suggested by the YouTube video. It should be easy enough for you to use UNetbootin to create a bootable USB from the downloaded ISO. If you are unsure which drive is your USB, enter diskutil list in the Terminal.

Reboot the problem computer and boot from the USB. Some BIOS will complain about the USB breaching a security policy. You’ll need to enter BIOS and disable the UEFI security. This will vary based on your BIOS version. It is usually pretty obvious and listed under Boot or Security.

Once you are able to boot from the USB. Select the first option and follow the prompts until you reach the Terminal. Type gdisk -l /dev/sda to find your Windows partition. The largest partition on your main drive is usually the safe bet.

You can try to mount the Windows partition using mount /dev/sda? /mnt (replace ? with the partition number). If you get an error message about the NTFS partition being hibernated you can try mount -t ntfs-3g -o remove_hiberfile /dev/sda? /mnt as an alternative.

Now we can perform the steps as demonstrated in the video:

  1. cd /mnt/Windows/System32/Config
  2. chntpw -i SAM
  3. Press 1
  4. Enter the RID of the user you wish to change the password for.
  5. Press 1
  6. Press q
  7. Press q
  8. Press y
  9. cd
  10. umount /mnt
  11. reboot

While the computer reboots, unplug the USB. Your user account should now login without any need for a password. Once logged in, you can go into your user account and reset your password from within Windows.

There are several other methods of resetting a Windows password. It really comes down to what you have available. I believe the Offline Windows Password & Registry Editor uses a very similar process. There is also the Sticky Keys trick, but that only works if Sticky Keys are enabled prior to being locked out.

Cloudflare Logo

Use CloudFlare for Dynamic DNS on Windows

The most popular Dynamic DNS provider, DynDNS, is now a paid service. There are other alternatives, each with their own pros and cons. Many DNS updaters, modems and routers support DynDNS. If you own a domain already this solution might interest you.

With a Static IP, you only need to create a permanent A record in DNS management. Most domain registrars do not allow Dynamic DNS. The server I want to access via subdomain has a Dynamic IP. While researching possible solutions, a friend hinted that you can update A records using the CloudFlare API. The domain already uses CloudFlare, so this is great news.

If you have got this far, you already know how to configure your firewall and port forward. You should be able to access the server from the internet using your IP address and port.

Follow the CloudFlare setup to point your nameserver to the correct location. If you intend to use a subdomain, create the A record in DNS management. Make sure CloudFlare is off for this record (optional, might be ok for your purposes).

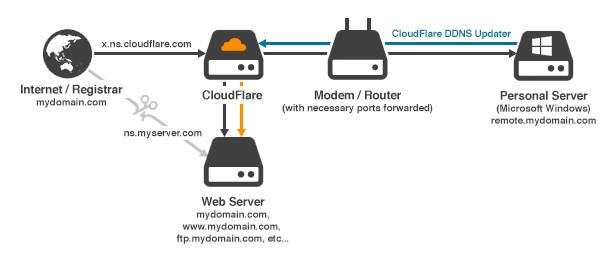
Cloudflare Diagram

There are various ways to make a CloudFlare DNS updater, but no easy solution for Windows. I recently stumbled on one that works well, CloudFlare DDNS Updater. You can download it here.

You will need your API Key, primary domain name and the email address associated with your CloudFlare account. Once successful it will download your DNS records. You can then select which one you want to update. DNS propagation may take some time. Check CloudFlare to see if the address matches your IP address, then test from another internet connection.

It’s usually only $5-10 a year to register a domain. CloudFlare is a free service. This solution is cost effective and cleaner than having a subdomain of a free Dynamic DNS provider. No need to worry about confirming the DNS every 30 days, and remote.mydomain.com is far nicer than mydomain.freedns-rulez.net.

Note: In some environments (64-bit) CloudFlare DDNS Updater will not install as a service, there is a bug in v0.1. If you set the username as .\username rather than just username, it will successfully install as a service.